Results 1 to 10 of 14

Thread: How To: Install 4xG Matrix

Hybrid View

Previous Post Previous Post   Next Post Next Post
  1. #1
    Lifetime Member Getting Dirty
    Join Date
    Jul 2011
    Location
    U.S.
    Posts
    1,355
    Rep Power
    14
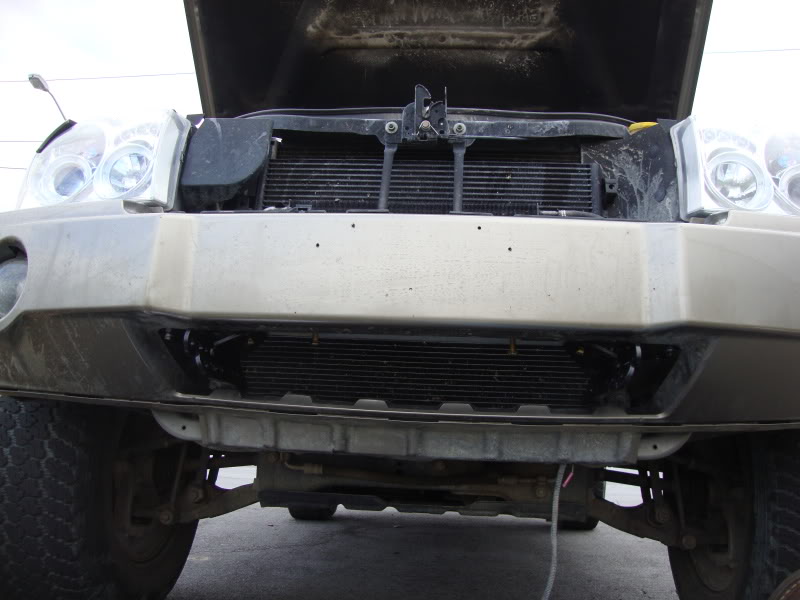
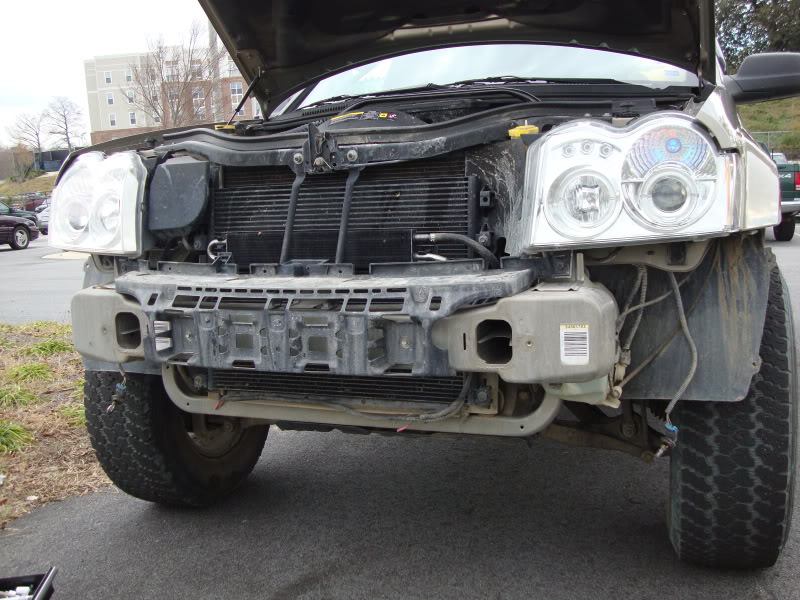
    Wallaaaaaa - After everything has been removed - This is how your WK should like (and how your XK might look). We are ready to begin installing stuffs.. yayyyy rawrrrrr!!


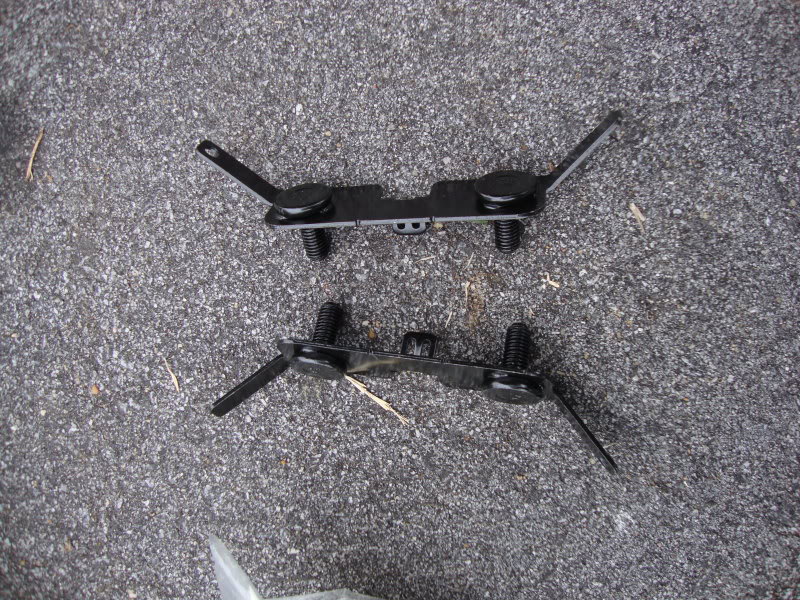
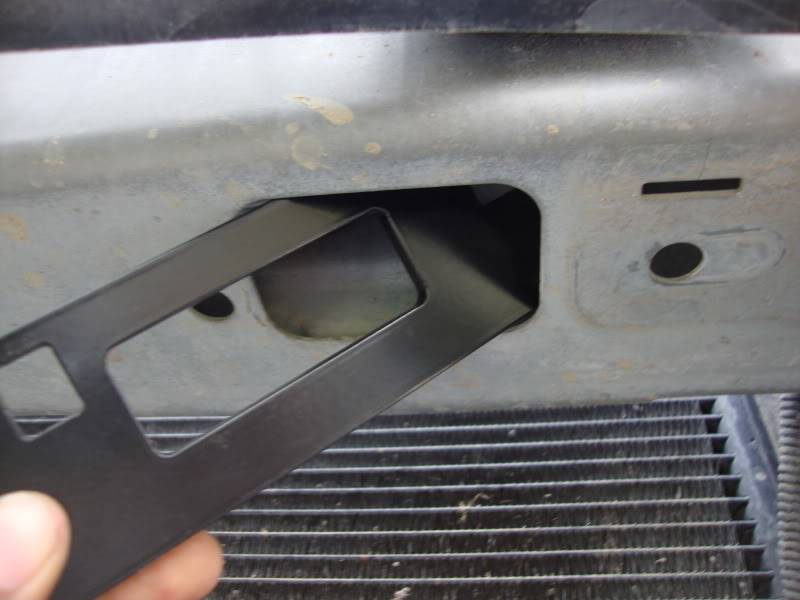
    Pull these brackets out of the bag, get them ready... they are next!


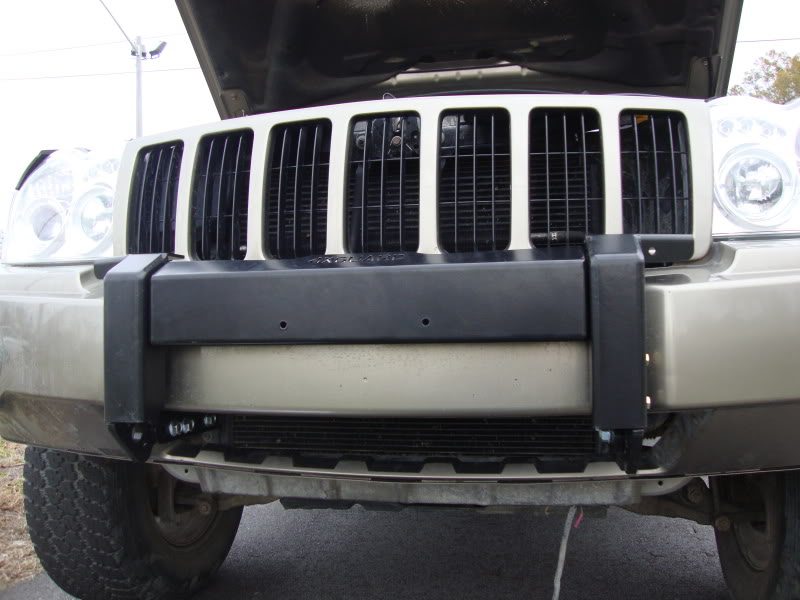
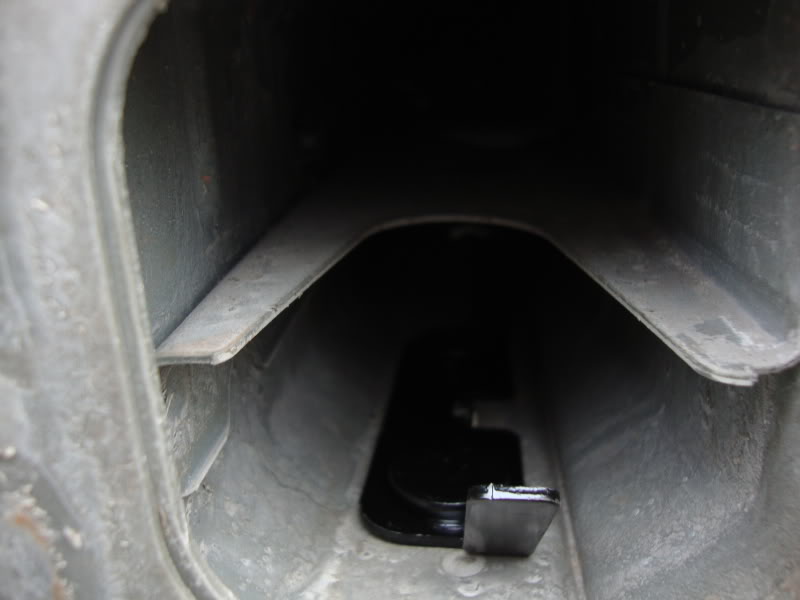
    Place these brackets LIKE SO... so that they fit... Just like a puzzle!! yeeaaahhhhh.

    Passenger side


    Driver side


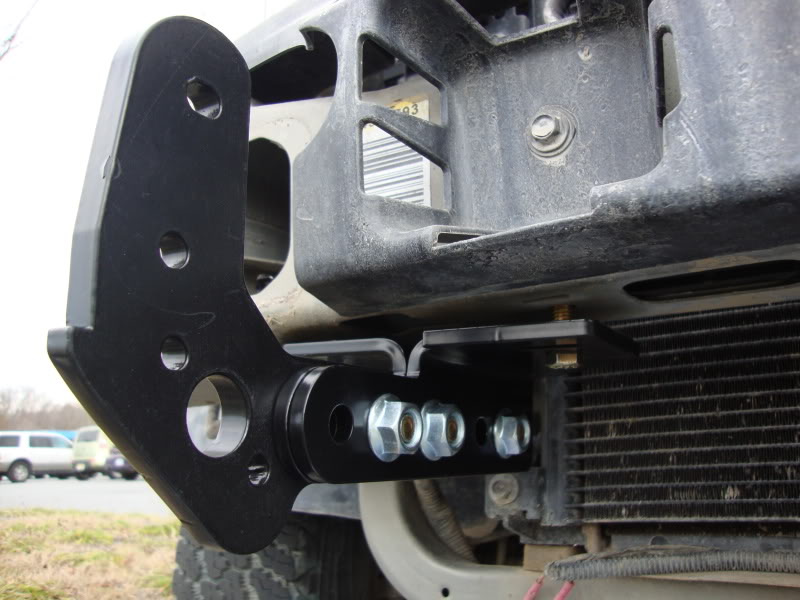
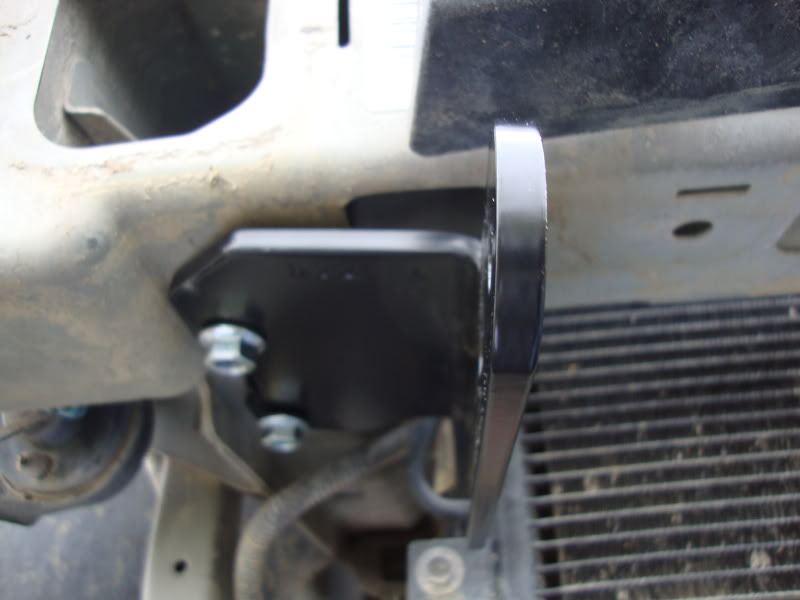
    Retreive your first piece of 4xG mounting parts and install! (Part numbers XG-K200.01 and XG-K200.02) Pictured BELOW!
    It will be bolted to the mounting brackets you just placed inside the cross member. Use the nuts you PURCHASED, and hand tighten this part to the bracket. (4xG stresses that you do NOT fully tighten... so I stress you just hand tighten.)

    Passenger Side - follow this procedure for both sides


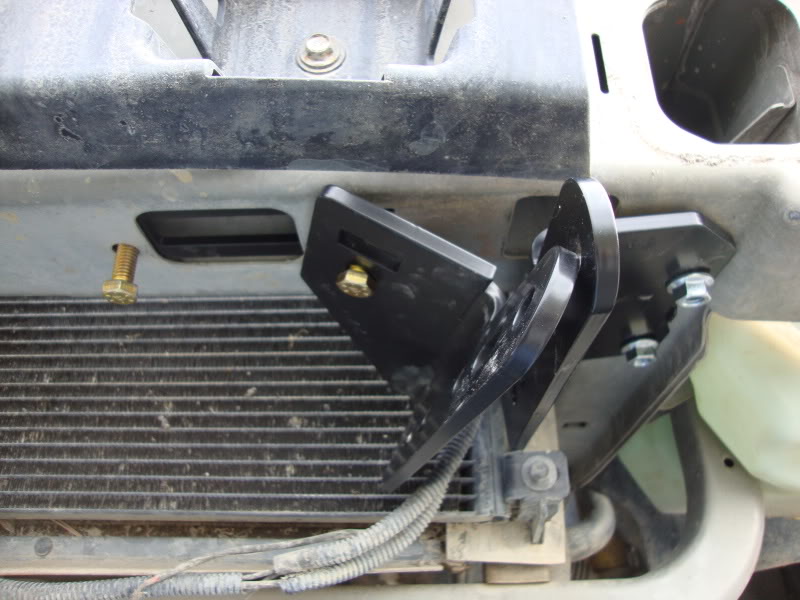
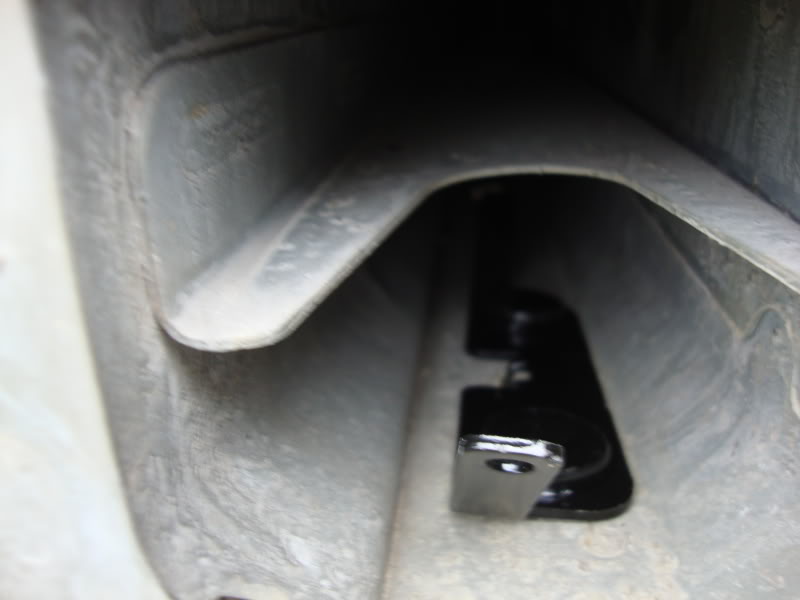
    Please pay close attention to how these backing plates are placed inside the cross member. There are two squares on each of these brackets.. you want the side of this bracket with the GREATEST distance between the squares facing OUTWARD. Match these up with the holes that go through the frame. Line everything up because we will be installing the inside mounting brackets next!


    Get your inside mounting brackets - part numbers XG-K200.03 and XG-K200.04) using two 1.25” x 7/16” hex bolts and install them.. Place bolts in the holes and screw them in, with your other hand hold the inside back plate in place and also hold the nut over the hold while you twist the bolts in. Picture below! (In this picture I used the wrong screws - I did fix this, but don't make my mistake, I had to go back)
    Last edited by AJeepZJ; 12-12-2011 at 06:34 PM.

  2. #2
    Lifetime Member Getting Dirty
    Join Date
    Jul 2011
    Location
    U.S.
    Posts
    1,355
    Rep Power
    14
    Remember those two black steel 'cups' with a single screw we removed from the cross member behind the bumper to place the OEM mounting brackets on? Go ahead and put those back on. and then it is ok to go ahead and Place the bumper back on the Jeep - You do not have to bolt and fasten it back onto the Jeep just yet - In fact, I would recommend you not do that. Just put the bumper back on.


    You should have the outside brackets, backing plates, and inside brackets installed at this time. We are now moving on to the 4th item. The bow shackle brackets aka Part Numbers (XG-K221.05) on the outside of the mounting brackets we just installed. Start by aligning the rear most hole of the bow shackle bracket with the rear most hole in the mounting brackets. Use three 1.5” x 1/2” hex bolts with 1/2" lock flange nuts. Pictured below is how it will look.


    Assemble the 4xGuard Center bracket with the two sides that go on it... Part numbers XG-K220.10 to the light tab brackets part number (XG-K221.07 and XG-K221.08) with the provided 3/4” x 3/8” hex bolts and 3/8” lock nuts. Do this over grass or in your lap to prevent scratches and stuff to the face of it (prevent rust).


    bolt the bumper back on, reinstall the grill, reconnect your fog lights and BAM!!! Check for tighteness and allignment. Make sure everything is nice and tight. I never really truly specified when it was ok to go ahead and tighten everything. This is a step that can practically be done at the very end.
    Last edited by AJeepZJ; 12-15-2011 at 06:43 AM.

  3. #3
    Lifetime Member Getting Dirty Matt's Avatar
    Join Date
    Feb 2011
    Posts
    7,771
    Rep Power
    22
    Awesome job man!!

    You just made one mistake... you forgot this isn't JF. We don't need to post all of our threads in the same "general forum" where they'll eventualy get drowned out and lost.... we actually have a tech article area: http://www.theultimatejeep.com/forum...s-Staging-Area


  4. #4
    Senior Member Getting Dirty CmmdrDan's Avatar
    Join Date
    Mar 2011
    Posts
    782
    Rep Power
    14
    Nice Job sir. I wish i was able to actually help. Instead of take the bumper off and put it back on..

  5. #5
    Administrator
    Join Date
    Sep 2019
    Posts
    1
    Blog Entries
    36
    Rep Power
    10
    Quote Originally Posted by Matt View Post
    Awesome job man!!

    You just made one mistake... you forgot this isn't JF. We don't need to post all of our threads in the same "general forum" where they'll eventualy get drowned out and lost.... we actually have a tech article area: http://www.theultimatejeep.com/forum...s-Staging-Area

    Moved it over to the tech staging area.
    2006 XK Limited, 5.7L Hemi
    Dark Khaki, QDII, Rocky Road 2.25" lift, Steel Armadillo front bumper with Warn PowerPlant winch, Steel Armadillo rear bumper w/ tire carrier, Rock Sliders, Light Bar & Front Fender Tube Fenders, 4xGuard belly skid plate & rear differential guard, BFG M/T A/T 255/75R17s on Rubicon rims, Spidertrax 1.5 inch wheel spacers, Rhino Rack Pioneer Tray with FoxWing Awning, Superchips VIVID Programmer, Air Flow snorkel, Steel Armadillo Secure Console, Cobra CB Radio, Lock Pick Video Programmer, ASFIR Skid Plates.

    Knappster's Garage


    Profile for Knappsters

    AKA: the Owner of The Steel Armadillo L.L.C.

  6. #6
    Lifetime Member Getting Dirty
    Join Date
    Jul 2011
    Location
    U.S.
    Posts
    1,355
    Rep Power
    14
    Quote Originally Posted by Matt View Post
    Awesome job man!!

    You just made one mistake... you forgot this isn't JF. We don't need to post all of our threads in the same "general forum" where they'll eventualy get drowned out and lost.... we actually have a tech article area: http://www.theultimatejeep.com/forum...s-Staging-Area

    I coyldnt seem to post out in the 'how to' section shop I just created it In general and hoped one of you guys would move it lol.

  7. #7
    Lifetime Member Getting Dirty Matt's Avatar
    Join Date
    Feb 2011
    Posts
    7,771
    Rep Power
    22
    Aaaahhhh.... lol I got ya.

    You were probably trying to post in the wrong section. You're supposed to post in the "tech articles staging area". Then once the how-to has been created/discussed/edited it gets moved to the how-to forum.

  8. #8
    Lifetime Member Getting Dirty Sal-XK's Avatar
    Join Date
    Jun 2010
    Location
    Raeford NC
    Posts
    5,201
    Rep Power
    20
    Yes the actual How To section is closed to posting so once it's in there no more replies to thread be made. Let us know when you think its all done and I'll copy the post to the how to section and clean it up all the replies and stuff.

Thread Information

Users Browsing this Thread

There are currently 1 users browsing this thread. (0 members and 1 guests)

Similar Threads

  1. Fit 4 9" lights on 4xGuard Matrix!
    By Matt in forum Exterior Modification
    Replies: 27
    Last Post: 06-09-2011, 03:15 AM
  2. Matrix- 4xGaurd Installed......
    By IamJEEP in forum Exterior Modification
    Replies: 20
    Last Post: 02-21-2011, 10:28 AM
  3. 4xguard Matrix/grill hoop!!!
    By 06blkhemi in forum Exterior Modification
    Replies: 8
    Last Post: 11-08-2010, 07:01 PM

Posting Permissions

  • You may not post new threads
  • You may not post replies
  • You may not post attachments
  • You may not edit your posts
  •